tl;dr: Source code containing all of this and much more can be found on github. Follow the readme to use.
As a whole, science and technology have made incredible advancements in aesthetics. Programming presentations are succinct, biologists have made videos like this and this, and physicists can point to every image of space ever taken.
However, most chemistry graphics look like they were thrown together by a toddler. I understand the sentiment behind this: “it’s the science that matters”, “I can’t waste time learning how to do this”, blah blah blah. While that’s kind of true, no one will even read your paper if it has these graphics. Seriously, anything short of a cure for cancer will be skimmed over if it isn’t visually appealing. You’ve spent months to years working toward a paper; you can afford yourself a week or two to make your graphics look decent.
As my inaugural scientific visualization post, let’s start with one of the most common visualization tasks for chemists. I will show you how to easily draw any molecule in blender.
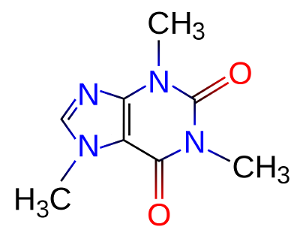
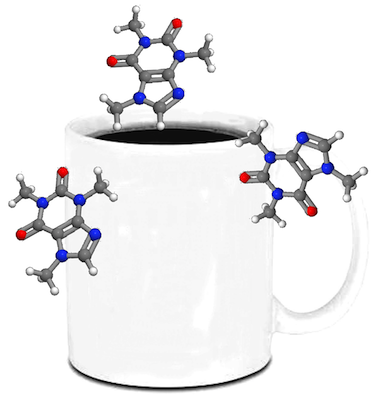
The typical approach involves Powerpoint (or Photoshop/GIMP for the more artistically inclined) and a program already in their workflow (e.g. JMol, Mercury, etc.). This approach is easy to learn and produces graphics that meet the industry standard. Let’s take an example molecule - caffeine - and work through the process.
First, we get the molecular structure from wikipedia or the nearest nerdy coffee mug (ie. why I chose this example). It looks like this:
Next, we download a chemical program (in this case, JMol) and render the structure. This gives us:
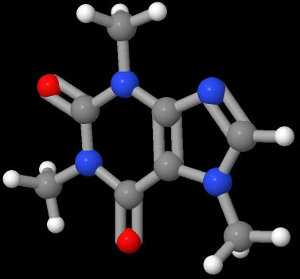
From here, we make the black background transparent and copy and paste it around a coffee mug or something.
Now, you submit this graphic to Nature or Science with your manuscript. When you get your reviewer comments, there’s a good chance they will be harsh and almost nonsensical. Why? Because no one actually read your work. They saw no pretty pictures, which means they didn’t read any of it in depth, which then caused the aforementioned comments. It’s not fair by any means, but you can’t really blame them. It’s exactly what you would do if you were told to critique a pile of manuscripts.
Here’s the core problem: most molecule viewers are designed for day-to-day chemistry work, not graphics rendering. Using these programs for cover art is the wrong tool for the job. What we need is a high-powered program designed for computer graphics rendering, and then a simple means to add molecular structures into it.
Enter blender, an open-source 3D modeling program with an amazingly active community of developers and users. With training, it can be used to create movie-quality computer graphics. With almost no training, it can still produce scientific visualizations orders of magnitude better than what’s currently out there. The best part is its incredibly organized Python API, which makes it easy to add in our own logic and automate repetitive tasks.
Blender works like most 3D graphical editors. We draw primitive objects (ie. spheres, cylinders, etc.), overlay them with materials and textures, and adjust our viewport and lighting. In order to draw molecules without adding shapes by hand, we need to use Python for some heavy automation.
First, let’s look into how we will want to specify chemical structures. The world of chemistry is littered with terrible file formats, and, due to the general resilience of legacy standards, we will need to consider them. Before we get to that, however, let’s decide upon a good extensible representation of molecular data. The common representation used in coding is called JavaScript Object Notation, or json, and it is very good at succinctly representing arbitrary data. If you’ve never heard of it before, I highly recommend reading up on it before continuing. Here’s the wiki.
As molecules are a subset of “arbitrary data”, json should suit our needs. Our drawer will need atom element types and 3D locations, and bond connections and orders. Therefore, let’s use something like shown below (the example is for ethane).
{
    "atoms": [
        { "element": "C", "location": [ 0.252, -0.116, -0.704 ] },
        { "element": "C", "location": [ -0.252, 0.116, 0.704 ] }
    ],
    "bonds": [
        { "atoms": [ 0, 1 ], "order": 1 }
    ]
}
This is easy to parse in Python - import json; data = json.loads(string).
In two lines, we now have a Python data structure! If we wanted to print, say,
the y coordinate of the first atom, we could do so with
print(data["atoms"][0]["location"][1]). This will come in handy later.
Now, back to the matter at hand. We want to offer support for the hundreds of
file formats out there (molfiles, smiles, sdf, cif, pdb, etc.), but parsing them
all is an absolute nightmare. In a previous version of this post, I recommended
parsing a molfile directly. I now take that back. That was stupid. Let’s use Pybel,
a Python wrapper on the openbabel library.
Download it, and then we can unify all of these file formats in one line of code
- molecule = pybel.readstring(format, string). If there is no positional data
in the input file format, we can generate it by simply calling molecule.make3D().
Now, if we can convert this unified format to json, we will have a unified data format without needing to write any more parsing logic.
def molecule_to_json(molecule):
    """Converts an OpenBabel molecule to json for use in Blender."""

    # Save atom element type and 3D location.
    atoms = [{"element": atom.type,
              "location": atom.coords}
             for atom in molecule.atoms]

    # Save number of bonds and indices of endpoint atoms
    bonds = [{"atoms": [b.GetBeginAtom().GetIndex(), b.GetEndAtom().GetIndex()],
              "order": b.GetBondOrder()}
             for b in openbabel.OBMolBondIter(molecule.OBMol)]

    return json.dumps({"atoms": atoms, "bonds": bonds})
There is some additional messiness in the github repository to handle corner cases, but this function should generally work.
Converting from the molecule object to json will help us out in many ways. For example, we can test the quality of our file format converter without even needing to involve blender (it’s better to debug code in isolated chunks than it is to debug the whole thing). If you want to cross-check your work, load your file into imolecule. If your json is invalid, this tool will print an error. And, if you want to skip format conversion logic entirely, click the “save as” button in the window. Cool, right?
Remembering that the task at hand was to create a caffeine molecule, let’s do so.
I’m partial to the SMILES representation of small molecules, which can be found
all over the internet. Caffeine’s SMILES is O=C1C2=C(N=
import pybel
import json

molecule = pybel.readstring("smi", "O=C1C2=C(N=CN2C)N(C(=O)N1C)C")
molecule.make3D()

with open("caffeine.json", "w") as out_file:
    out_file.write(molecule_to_json(molecule))
This will create a file called “caffeine.json” that will reflect the json example
shown above. (Note: in the sample code shown here, the json will be printed on
one line without most of its whitespace. If you want to add whitespace back in,
add indent=4 to the json.dumps method in the converter.)
With a single data format and no more need of external libraries, we are ready to use Blender!
Using Python in Blender requires a bit of explanation. While its API is through a Python package, this library only works in Blender’s own script editor (there are workarounds that I’m not getting in to; let’s use Blender the way the developers intended). Rather than thinking of Blender as a Python library, think of Python like a feature of Blender. Backwards, I know, but it makes sense when you start using it. Start up Blender, click and drag the top right tab to create multiple windows, and then select the text editor. Repeat to add in a Python console.
That’s it. You have your Python editor directly in Blender.
As you become comfortable with 1. your terminal (especially on mac/linux) and 2.
Blender, you can now run Blender Python scripts directly in a terminal. Typing
blender -P my_script.py will open a new Blender window with the results of the
script loaded. However, for the sake of learning, I recommend following the previous
approach for at least a little while.
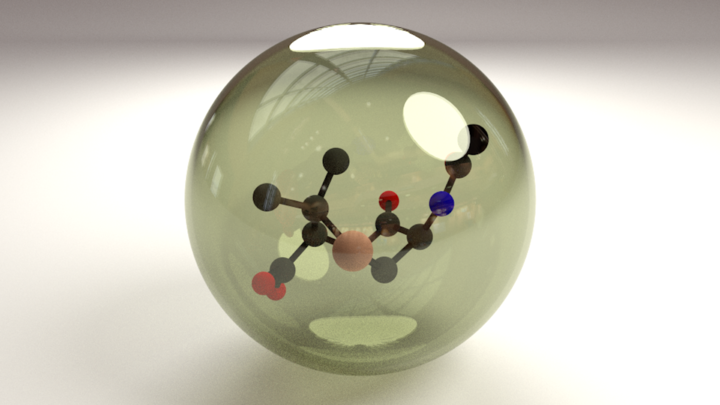
All example renders shown below were done with no lamps. I used ambient occlusion with environment lighting. This produces good results in this example with minimal work on our part. (To copy this setup, click the little globe in the right-hand panel. There will be checkboxes for both of these options.)
First, let’s load the caffeine.json file we made.
import json
with open("/path/to/caffeine.json") as in_file:
    caffeine = json.load(in_file)
That’s it. Now that we have the necessary information in a Python data structure, let’s look into drawing. For simplicity, let’s start with an atom-only space-filling model. The atoms will all be spheres. Easy enough. We will iterate through the data we collected previously and, using Blender’s “bpy” Python library, draw the shapes we need.
import bpy
import json

def draw_molecule(molecule):
    """Draw a molecule to blender."""
    for atom in molecule["atoms"]:
        bpy.ops.mesh.primitive_uv_sphere_add(location=atom["location"])
        bpy.ops.object.shade_smooth()

with open("/path/to/caffeine.json") as in_file:
    caffeine = json.load(in_file)
draw_molecule(caffeine)
For each atom, we draw a sphere at the specified location.
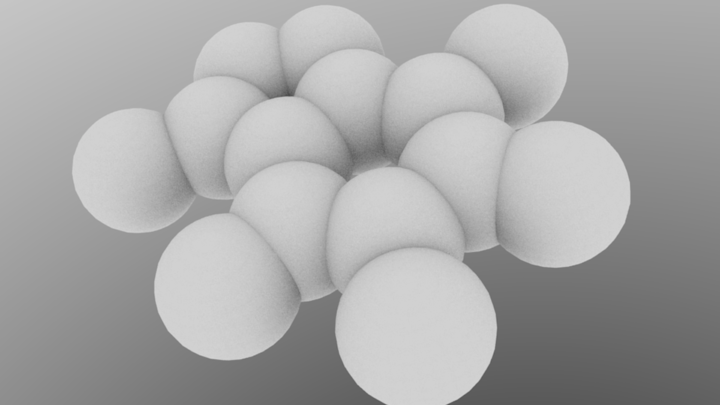
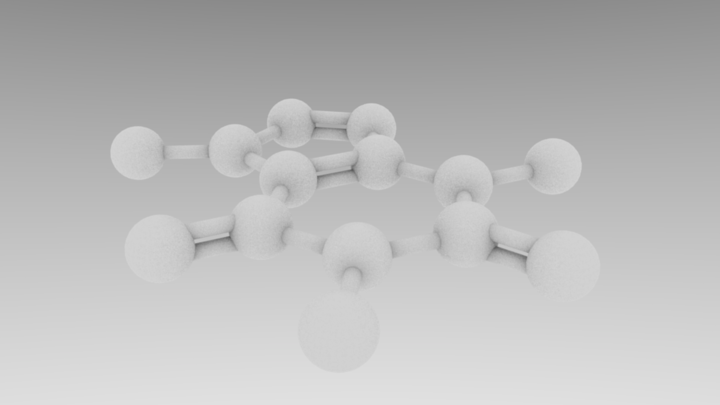
We’re already starting to see the shape of the molecule forming, and we can see Blender’s awesome rendering capabilities. With nothing more than a few spheres, the molecule is looking pretty good. For the next step, let’s reduce the size of the atoms and add in bonds.
We have bond information that we currently aren’t using. We will need to figure out where to draw each bond, and then place cylinders in the corresponding locations. As Blender requires a magnitude and a direction for each bond, we will need to use some vector mathematics. Let’s add to the the above function.
import bpy
import json

# New imports!
from math import acos
from mathutils import Vector

def draw_molecule(molecule):
    """Draw a molecule to blender."""

    # Draw atoms
    for atom in molecule["atoms"]:
        bpy.ops.mesh.primitive_uv_sphere_add(size=0.4,
                                             location=atom["location"])
        bpy.ops.object.shade_smooth()

    # Draw bonds
    for bond in molecule["bonds"]:

        # Extracting locations
        first_loc = molecule["atoms"][bond["atoms"][0]]["location"]
        second_loc = molecule["atoms"][bond["atoms"][1]]["location"]

        # Useful values
        diff = tuple([c2-c1 for c2, c1 in zip(first_loc, second_loc)])
        center = tuple([(c2+c1)/2 for c2, c1 in zip(first_loc, second_loc)])
        magnitude = pow(sum([(c2-c1)**2
                        for c1, c2 in zip(first_loc, second_loc)]), 0.5)

        # Euler rotation calculation, (Vector from mathutils, acos from math)
        Vaxis = Vector(diff).normalized()
        Vobj = Vector((0,0,1))
        Vrot = Vobj.cross(Vaxis)
        angle = acos(Vobj.dot(Vaxis))

        bpy.ops.mesh.primitive_cylinder_add(radius=0.1, depth=magnitude,
                                            location=center)
        bpy.ops.object.shade_smooth()
        bpy.ops.transform.rotate(value=(angle,), axis=Vrot)
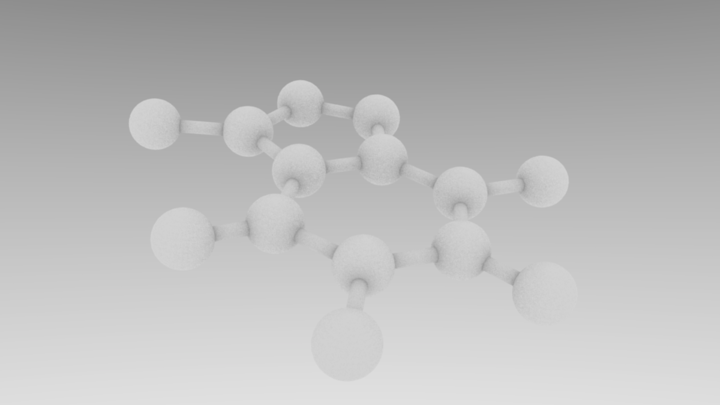
Don’t get too scared by the mathematics; it’s all basic vector operations. We get the coordinates of each atom in the bond, and then convert to a magnitude and a direction. Size the cylinder by its magnitude, and then rotate to the desired direction. Reducing the atom radius to 0.4, we end up with:
It’s getting close. Before moving forward, let’s add in support for double and triple bonds. This will require the ability to translate cylinders orthogonal to their current direction. With our previous vector math, this should be easy. Let’s make translation rules for each type of bond, and then use those as needed.
# Specify locations of each bond in every scenario
    if bond["order"] == 1:
        trans = [[0] * 3]
    elif bond["order"] == 2:
        trans = [[0.7 * diameters["bond"] * x for x in v_obj],
                [-0.7 * diameters["bond"] * x for x in v_obj]]
    elif bond["order"] == 3:
        trans = [[0] * 3, [1.1 * diameters["bond"] * x for x in v_obj],
                [-1.1 * diameters["bond"] * x for x in v_obj]]
    # Draw bonds
    for tran in trans:
        bpy.ops.mesh.primitive_cylinder_add(radius=0.1, depth=magnitude,
                                            location=center)
        bpy.ops.object.shade_smooth()
        bpy.ops.transform.rotate(value = (angle,), axis=Vrot)
        bpy.ops.transform.translate(value=tran)
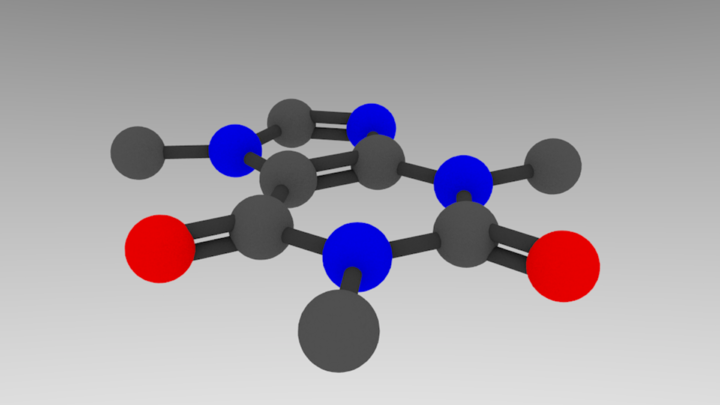
We create a list of translation vectors based on the number of bonds that exist. For single and triple bonds, one cylinder remains unmoved. All other bonds are in the direction of the local object axis, with the constants of 1.4 and 2.0 chosen as separation values. Adding this results in, well, exactly what you’d expect.
Materials are arguably the most important aspect of rendering in Blender. They have a lot of really cool options, and give meaning to the primitives underlying the render. The shapes we have been dealing with so far are rendered without materials, which is why they’re so boring looking.
For this example, let’s make materials for carbon, nitrogen, and oxygen and give them different colors. We will then assign these materials as we draw the shapes. In the drawing function, we will now start with:
colors = { 'C': (0.1, 0.1, 0.1), 'N': (0.0, 0.0, 1.0),
           'O': (1.0, 0.0, 0.0), 'bond': (0.05, 0.05, 0.05) }
for key in colors.keys():
    bpy.data.materials.new(name=key)
    bpy.data.materials[key].diffuse_color = colors[key]
    bpy.data.materials[key].specular_intensity = 0.2
The colors dictionary is in RGB format, so bonds -> gray, C -> lighter gray, N -> blue, and O -> red. For each atom, we make a material with this diffuse color, and we lower the specularity (“shininess”) to make it look less plastic-y. In the lines after each call to draw a sphere or cylinder, add:
bpy.context.active_object.data.materials.append(bpy.data.materials[element])
Which will, as you can probably guess, add a material to the active (most recently
added) object. In the case of bonds, replace element with "bond". Doing this
gives the following result:
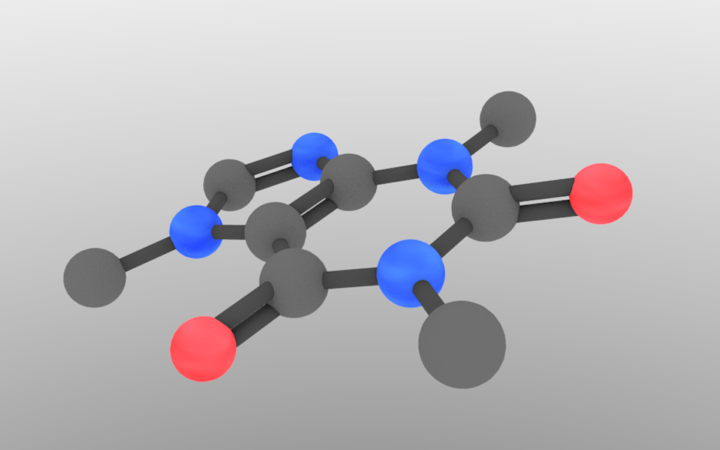
That’s basically it! Let’s add in some final aesthetic touches and generalize sizing spheres so we can use atomic radii.
One issue that we have yet to address is atom sizing. In our current code, hydrogen would be the same size as a heavy metal, which would make some weird-looking molecules. Luckily, this is an easy fix. Similar to our materials approach, let’s make a dictionary of sphere radii and functionalize them based off of the atom type.
radii = { 'C': 70, 'N': 65, 'O': 60, 'bond': 20 }
for key in radii.keys():
    radii[key] *= 0.4/70
I got the atom information from wikipedia, and chose a bond radius that didn’t look weird. The loop converts from larger numbers (easier to work with) to Blender sizes. It ensures that a carbon sphere is 0.4 Blender units, which is what we were using before. Now, all we have to do is generalize the sphere/cylinder drawing to something like:
bpy.ops.mesh.primitive_uv_sphere_add(size=radii[element], location=loc)
And we’re done. Doing this produces our final product. The sizing in this case is subtle, but it definitely helps in other examples.
I know that this might seem like a lot of work to just draw a molecule, but, once you understand the approach, you’ll be able to use it easily from here on out. With this script, I can draw a high-resolution molecule in a few seconds, additionally making it an easy approach to visualize an array of molecules.
Most powerfully, you now have access to this molecule in both Python and Blender. With Python, you can put this entire approach in a loop to draw different molecules in different locations. It’s almost as easy to draw ten thousand chemicals as it is to draw only one. With Blender, you can use the molecule as one aspect of a much larger 3D scene. This is great for cover images and TOCs.
Once again, the github repo can be found here. It runs much faster and handles a lot more corner cases. If any clarification is needed, feel free to leave a message in the comments!