I recently got married and had seriously the best wedding ever. However, that’s not the point.
When I thought “wedding”, I all-too-quickly thought “ooh wedding website” and “I’m definitely homemaking this”. My significant other let me run with it, as we are married after all.
I had a really fun time making the Future Fullers wedding website. It still has a touch of that “this was made by a backend developer” vibe but it’s not all that bad.
In backend developer fashion, I went deep into the things that regular people don’t even notice. See that image gallery? See how quickly it loaded? How it lazy loads as you scroll, how it uses progressive jpgs, and how all the images are pre-compiled to 1x and 2x pixel densities? No client-side processing needed! I even started playing with concatenating the image binaries to take the number of HTTP requests down before getting pulled off to work on something meaningful.
This is nothing compared to what I did with Google Maps. I really enjoyed getting to know the API and wanted to make sure it was documented for posterity. There are a few really cool features that people may not know about.
Here’s the full source code for those looking to just dive in and swipe their favorite feature.
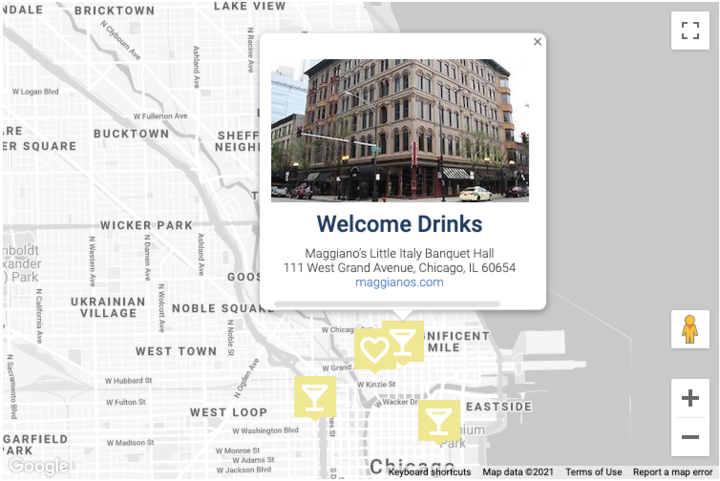
If you want your map to pop, custom markers go a long way. I used these to differentiate between restaurants, venues, airports, and more.
The Google Maps javascript library has a google.maps.Marker that can be easily themed and wrapped in a higher-level function. By loading in Google’s Material Icons font, we can quickly turn around custom markers.
<link rel="stylesheet" href="https://fonts.googleapis.com/icon?family=Material+Icons">
const marker = new google.maps.Marker({
  map: options.map,
  position: options.location,
  zIndex: 0,
  icon: {
    labelOrigin: new google.maps.Point(0, -25),
    path: 'square',
    fillColor: options.color,
    fillOpacity: 1,
    strokeWeight: 0,
  },
  label: {
    color: '#fff',
    fontFamily: 'Material Icons',
    fontSize: '36px',
    text: options.icon,
  },
});
All we have to do here is fill in the options. To change the inscribed icon, we just need to cross-reference the Material Icon font names. local_bar gives a martini glass icon, train gives a train, and so on. Put one in as a string and it’ll load in.
When you click a marker, it would be great for more information to pop up. This can be done with google.maps.InfoWindow, a fairly generic rectangular overlay that can be populated with data.
First, we build an info window:
const info = new google.maps.InfoWindow({ maxWidth: 300 });
Then, we register the window with a click listener:
marker.open = () => {
  if (info.content === infoContent) {
    info.setContent(null);
    info.close();
  } else {
    info.setContent(infoContent);
    info.open(options.map, marker);
  }
};
marker.addListener('click', marker.open);
The one trick with this (and common in this programming pattern) is not to create a bunch of InfoWindows. It’s always far more responsive if you create a single InfoWindow that you’re hiding, moving, refreshing the inner HTML, and revealing.
Once you have this set up, you can make some really cool map effects. You have full control of all the parts in Javascript, so you can programmatically assign any events you like and change any properties you like. You could make a marker that changes colors, an InfoWindow that triggers on hover, or make tighter connections between the map pane and the broader DOM.
Hope this helps!